Precise AI Photo Edits: The Red‑Box Trick With Gemini’s Nano Banana Model
Widely known as fotiecodes, an open source enthusiast, software developer, mentor and SaaS founder. I'm passionate about creating software solutions that are scalable and accessible to all, and i am dedicated to building innovative SaaS products that empower businesses to work smarter, not harder.
Last weekend, I spent a sunny and very hot afternoon in Lisbon(so glad summer is almost over) playing with Gemini’s Nano Banana, Google’s latest image‑editing model. When I first tried to tweak a photo, I did what most of us do: type a prompt, hit generate, squint at the output and repeat. It worked, but the back‑and‑forth was tedious and the model often ignored small details.
Then I came across a short post on Reddit’s r/GeminiAI that completely changed how I approach photo edits. A user discovered that instead of describing every change in a text prompt, you can draw boxes and add short notes directly on the image. You then tell the model to read the red text and remove it afterwards, and, most of the time, it nails the edits on the first try
Quick note before we dive in
If you’re experimenting with Gemini’s Nano Banana and need help getting the model to perform specific edits and having a hard time, I’d be happy to lend a hand. Reach out at hello@fotiecodes.com.
The red‑box technique: annotate, describe, edit
The idea is disarmingly simple:
Open your image in any editor: Any tool that lets you draw shapes and type works just fine.
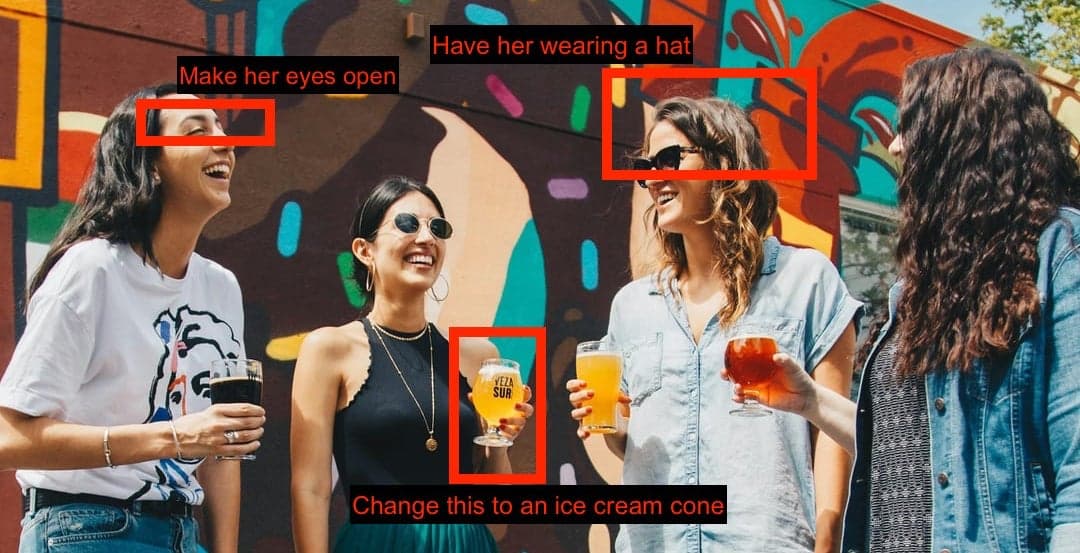
Draw a red rectangle around each area you want to change. Inside each box, write a short description of what you want. In the example image (a group of friends holding drinks), the annotations read “Make her eyes open,” “Have her wearing a hat,” and “Change this to an ice cream cone.”
Compose a short prompt for the model. The original post on reddit suggests using a prompt like “Read the red text in the image and make the modifications. Remove the red text and boxes.“ It works, however i had to do a handful of generations to get what i actually want. After some iterations i came out with a better and more detailed prompt that helps improve the resulting image.
“Read and interpret all red text annotations within the image. For each annotation, apply the requested modification only to the corresponding highlighted area. Do not alter or modify any other part of the image. Ensure that all edits blend naturally and look realistic, preserving original lighting, shadows, and textures. After applying all modifications, remove every red text annotation and its corresponding red box so that no editing marks remain visible in the final image.”
Upload the annotated image and run the prompt. The model reads your notes, performs the edits, and cleans up the annotations. After trying this on a couple of generations, i’d say nine times out of ten it gets everything right
By visually showing the model exactly where and what to change, you avoid vague language and iterative trial‑and‑error. This trick also scales well, annotate several areas at once and Gemini processes all of them in a single pass.
Why this works
At first glance, it feels almost magical that drawing a few red boxes can improve a state‑of‑the‑art AI model. But there’s a good reason. Gemini’s Nano Banana is built on top of the Gemini 2.5 Flash family of models, which combine language and vision to edit images. It lets you blend multiple images, maintain character consistency across outputs, and edit with precision using simple text commands. In other words, it’s already designed to follow instructions. The red‑box trick simply provides clearer instructions.
After looking around i found out that a few academic research backs this up. Image‑editing models started with simple caption‑guided approaches, but have evolved to accept free‑form text and reference images. Even so, many models still struggle when instructions involve multiple objects or complex interactions. Visual prompts, like bounding boxes paired with short descriptions help by localizing the edit and reducing ambiguity. By telling the model exactly what to change and where, you’re effectively performing context engineering for images.
Best practices for annotated prompts
Based on my experiments and the discussion in the Reddit thread, here are a few tips for getting reliable results:
Keep instructions short. “Make her eyes open” or “Replace glass with ice cream cone” is usually enough. Long sentences can confuse the model.
Frame the area tightly. Drawing the box too large may lead the model to alter more than you intend; draw it around the specific element you want changed.
Remove annotations after editing. Always instruct the model to remove the red text and boxes in the final output
Experiment with colours if red doesn’t work. You might want to experiment with different colors if red doesn’t work due to contrast amongst other things, don’t hesitate to try alternatives if your first attempt fails.
The bigger picture
The red‑box technique is more than a neat hack, it hints at where image editing might be heading. Researchers behind models like InstructAny2Pix point out that early AI editors could only handle simple, caption‑guided edits. Modern systems accept multi‑modal prompts that mix text, images and even audio, but they still struggle with complex, multi‑object instructions. Techniques like visual prompting and annotated edits help bridge this gap by giving the model structured, unambiguous guidance.
Gemini’s Nano Banana already raises this bar for consumer‑grade image editing. According to community benchmarks, it can blend images, maintain character consistency across outputs, and follow detailed commands. Adding simple annotation tricks extends its precision without needing specialized tools.
Final thoughts
As someone who loves tinkering with AI models, I’m excited by how a small change in workflow can unlock so much potential. This trick turns Gemini’s Nano Banana from a one‑prompt‑at‑a‑time toy into a serious photo‑editing assistant. It’s a reminder that when working with AI, context matters, and sometimes the best way to provide context is to show rather than tell.
If you’ve tried this technique, or if you’ve discovered other ways to make AI image editing more intuitive, I’d love to hear from you. Drop a comment below or send me a message. The more we share these insights, the better the tools will become for everyone.
Thanks for reading.
PS: Here is the image provided to the model with annotations, along with the results after an initial zero-shot generation below. Hey, it’s far from perfect but it works:)